Table of Contents
3D print WX station (OBSOLETE)
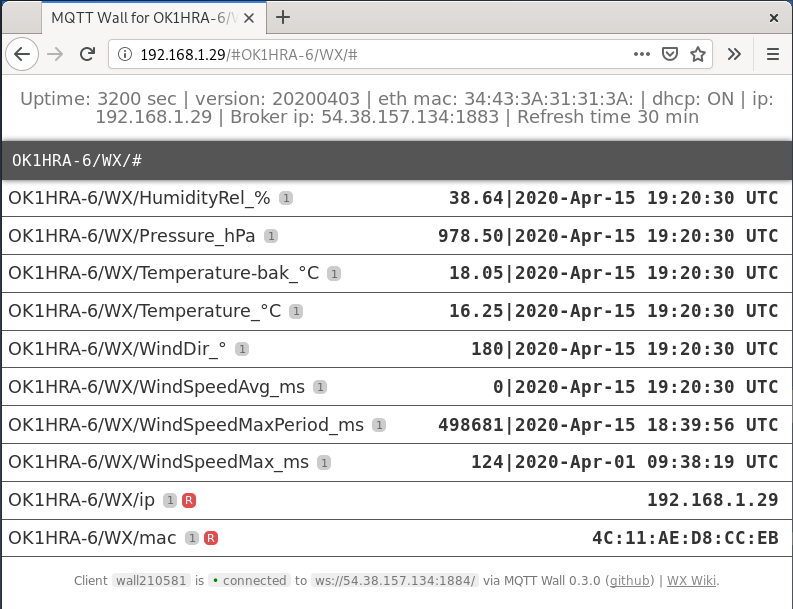
Web page
Instaled stations - OK1HRA-6 OK1KPA-6 OK1IRG weewx CR3DX-6
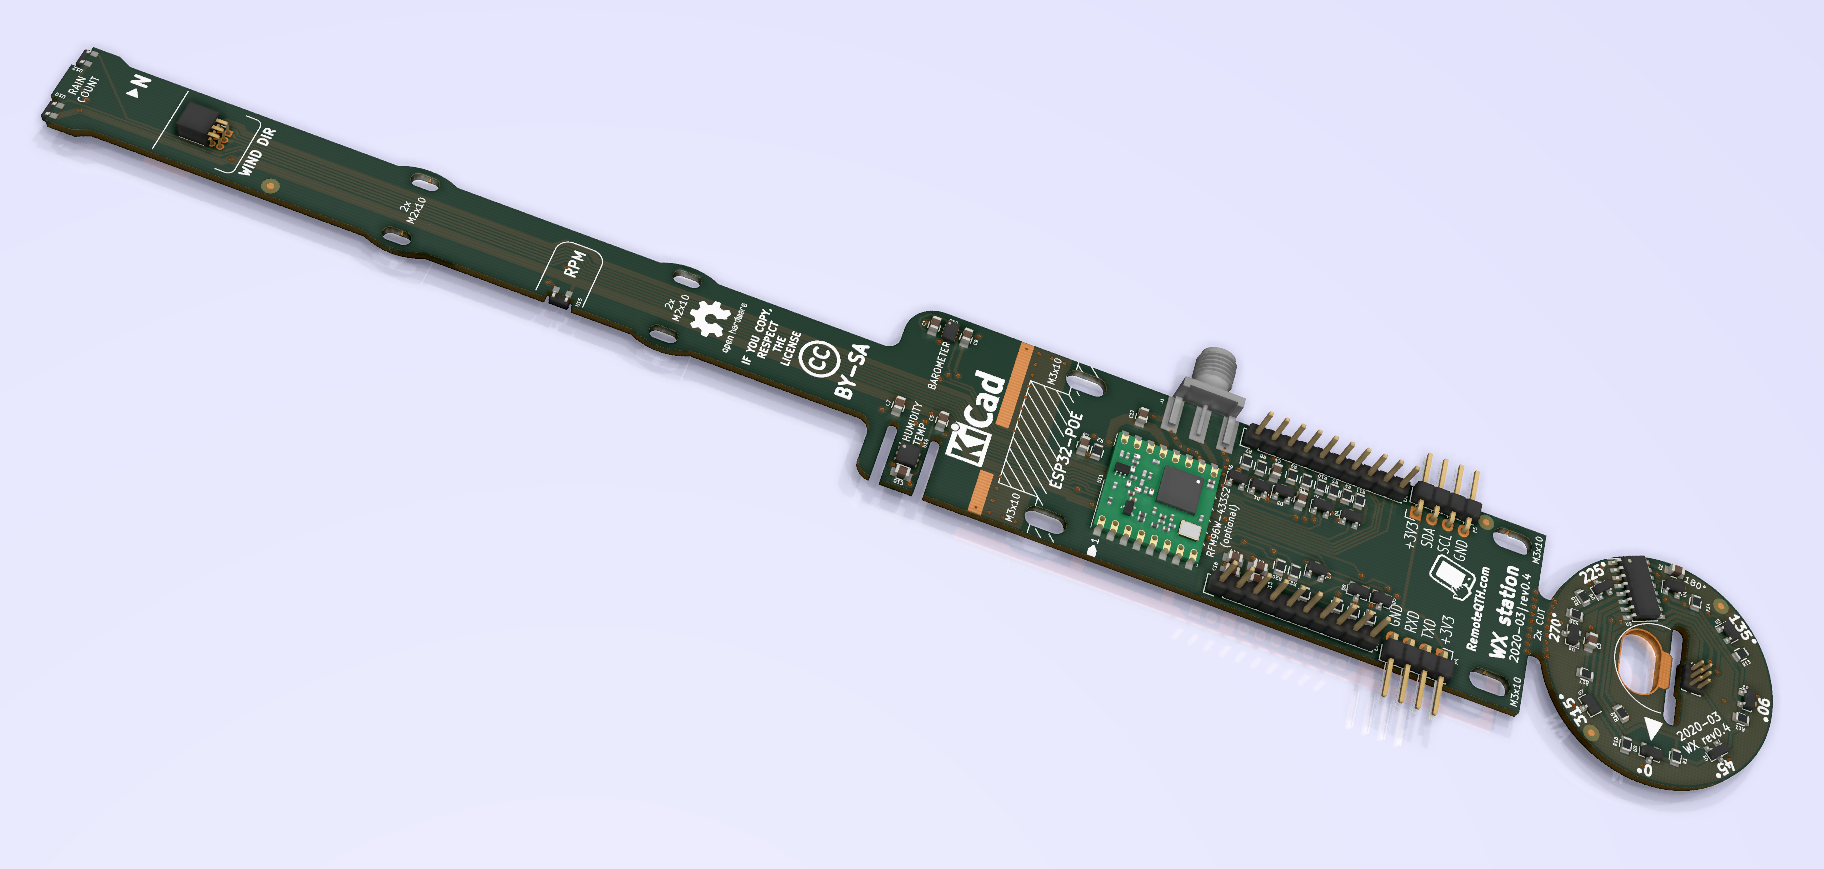
Electronics
Interactive BOM
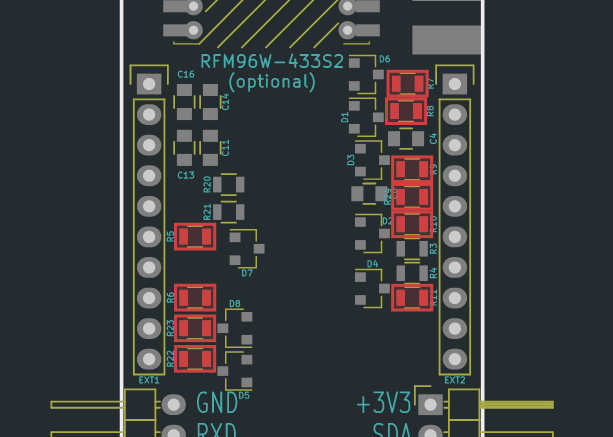
Schematics
For incomplete PCB, need
- U10, U12, U15 soldered from side of PCB - order
- soldered U14 order
- rev 0.4 issue - change resistors to 100R or soldered over existing
- soldered P1 order
- soldered P2 order
- soldered EXT1, EXT2 order
- connect ESP32-POE order
- POE injector order
- Warning: do not connect POE and USB cable in same time!
After PCB assembly
- Test if works
- Upload firmware to ESP32-POE, connect usb terminal and test sensor with neodyme magnet.
- hall efect sensor detect only north pole of neodyme magnets, therefore try to attach for find north pole and sign it with permanent pen. The output of the closed sensor can be monitored in the CLI on line (1 is open)

RpmPin 0 | Rain1Pin 1 | Rain2Pin 1
- Mask all connectors and sensors (U13, U14) and appply protective acrylic


Hardware
| part | pieces | order URL |
|---|---|---|
| M3x10mm | 7x | https://www.tme.eu/cz/details/m3x10_d912-a2/srouby/kraftberg/ |
| M2x10mm | 4x | https://www.tme.eu/cz/details/m2x10_d912-a2/srouby/kraftberg/ |
| brass threaded rod M6x250mm | 1x | |
| brass M6 nut | 2x | |
| bearings 61802 | 2x | https://www.zkl-loziska.cz/vyhledavani/?string=61802 https://www.tme.eu/cz/details/bb-6802-b180-30-es/valiva-loziska/igus/ |
| neodymium magnet 12x6x2mm | 4x | https://www.unimagnet.cz/kv-12-06-02-n_z401/ |
| neodymium magnet 5x3x1mm for rain sensor (NOT TESTED) | 2x | https://www.unimagnet.cz/kv-05-03-01-nh_z375/ |
| magnet glue (or another) | 1x | https://www.unimagnet.cz/499-lepidlo-UHU-plus-endfest-300.html |
| cable tie with a metal clasp | >2x | https://www.tme.eu/cz/details/bt2s-c0/stahovaci-pasky/panduit/ |
| PCB protective acrylic (optional) | 1x | https://www.tme.eu/cz/details/70_400/ochranne-a-stinici-povlaky/kontakt-chemie/74313-004/ |
| stainless steel threaded rod M6x+-125mm | 1x | for balacing wind azimuth |
| External outdoor DS18B20 temperature sensor | 1x | optional |
3D print
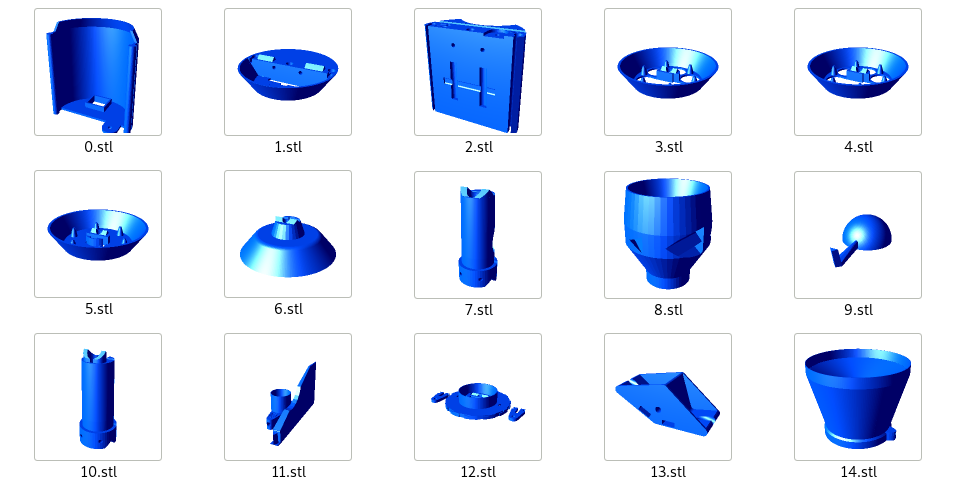
| part | filament | weight |
|---|---|---|
| 1,3,4,5,6.stl | WHITE PETG | 100g |
| 0,2,7-14.stl | NO-WHITE PETG | 350g |
Download 3d models
Part #2 designed for mounting tube with 58 mm diameter
For another diameter change value in OpenScad and export new .stl
MountDia = 58; // tube size for mounting
Firmware upload
- Install Arduino IDE
- Install ESP32 support from GitHub
- prefered via board manager
- Install Arduino libraries
- PubSubClient
- Adafruit_BMP280_Library
- Adafruit_HTU21DF_Library
- Adafruit_Unified_Sensor
- OneWire (optional if use external DS18B20 temperature sensor)
- DallasTemperature (optional if use external DS18B20 temperature sensor)
- Download firmware from GitGub
- Select menu Tools/Board:“OLIMEX ESP32-POE”
- Connect micro USB between ESP32-POE and PC
- WARNING: not connect USB cable and POE in same time!
- Select menu Tools/Port/YOUR-CONNECTED-PORT
- Upload firmware
- After firmware upload you can upload next version of the firmware via IP, if you computer in same network. In Arduino IDE shows another choice Network ports

- password for OTA upload is remoteqth
- After first upload also available upload binary via web
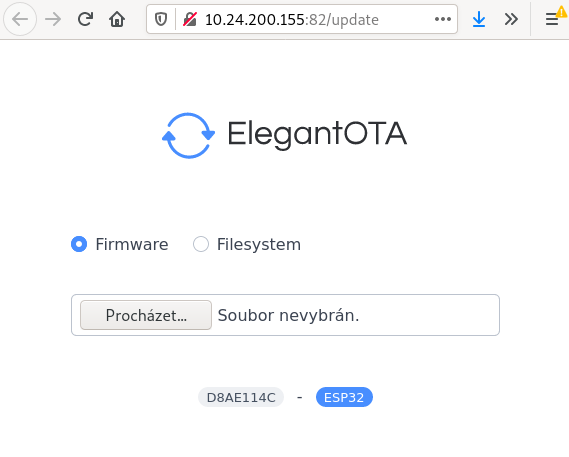
- binary available on release page
- web form find on http port 82 on WX station IP and /update foleder [WXstationIP]:82/update


Configure CLI
First step need get IP addres and telnet acces key
- After first upload firmware via USB, open serial monitor in Arduino IDE (Ctrl+Shift+M) and set
- baudrate to 115200
- No Line ending
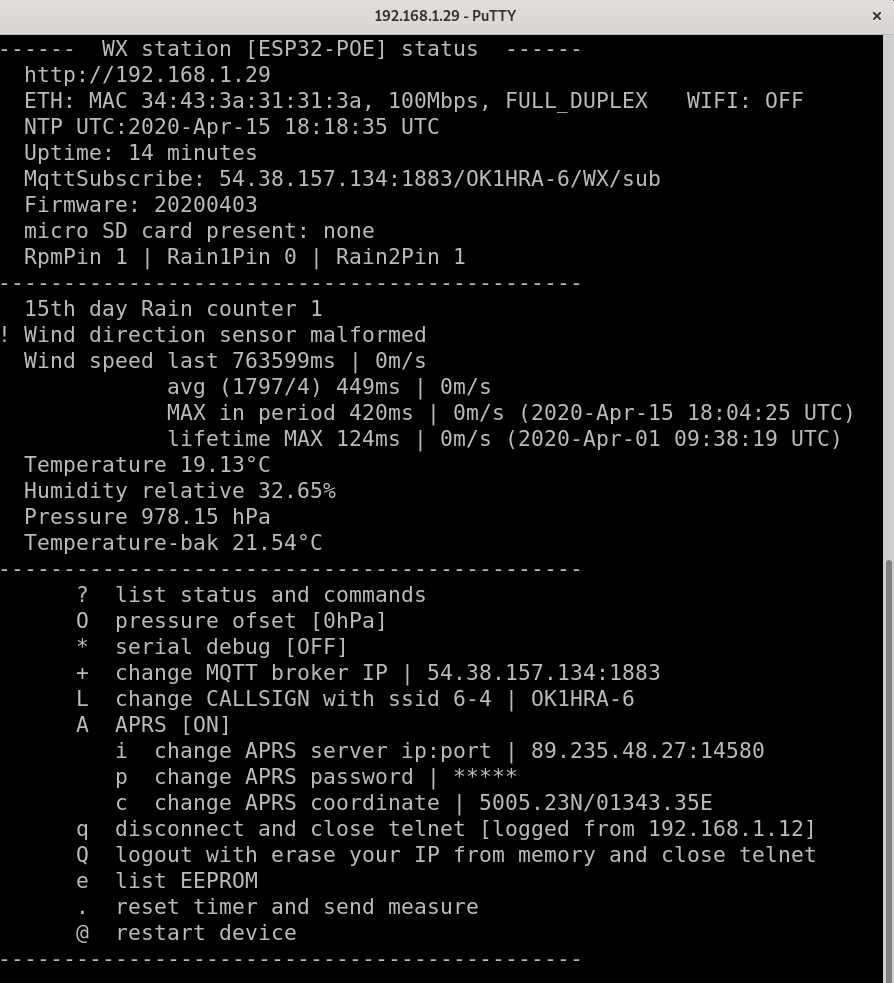
- write
?
and press enter show settings Command line interface
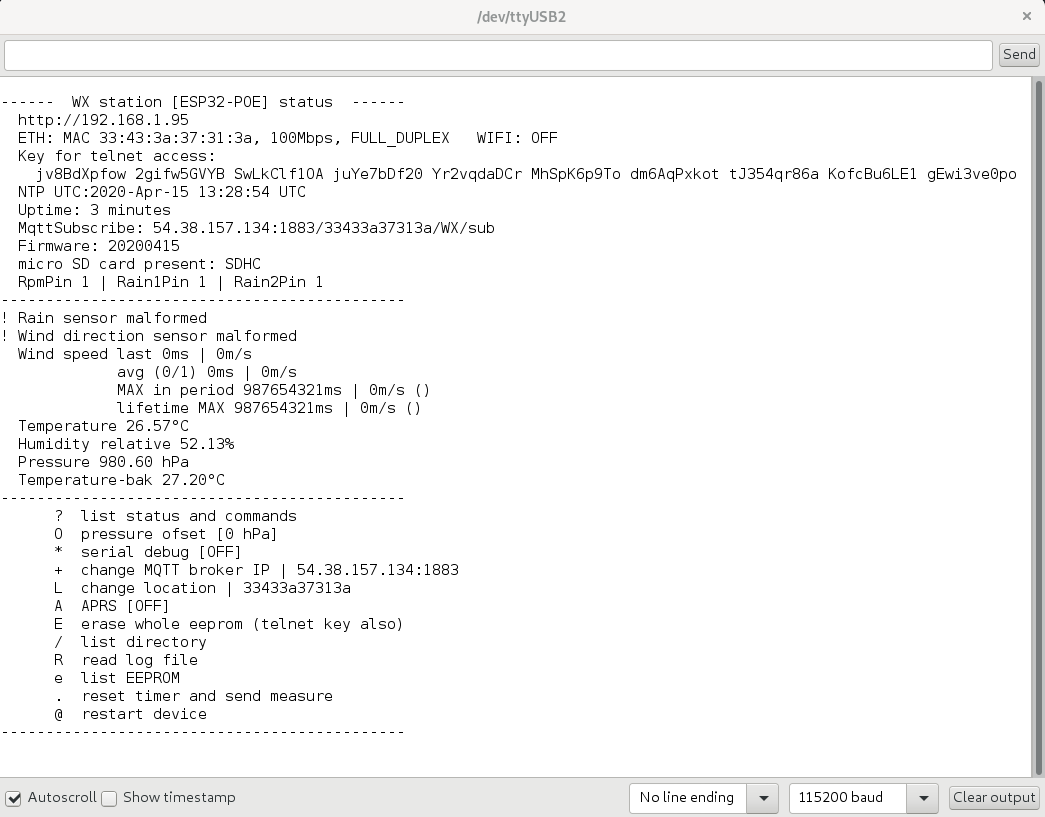
- Now copy and save
- IP address
- Key for telnet access (100 characters)

Key are generated automatically from internal pseudo random generator after start if EEPROM is clear. Therefore you can generate new key after clear EEPROM with E command.
Second step connect remotely via IP
- Download and install PuTTY
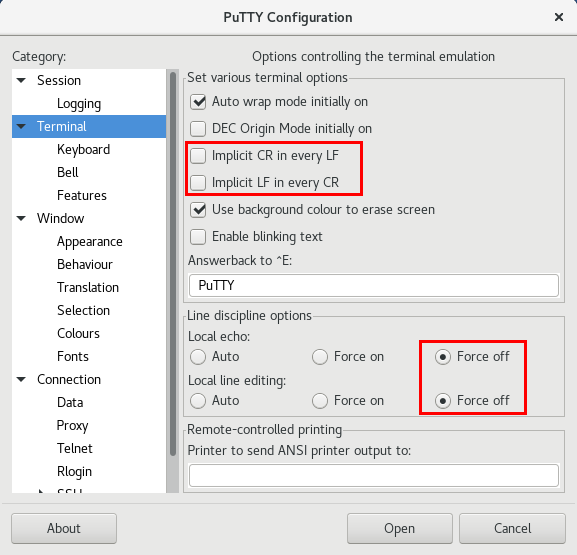
- In menu Terminal preset CR/LF and line discipline by picture
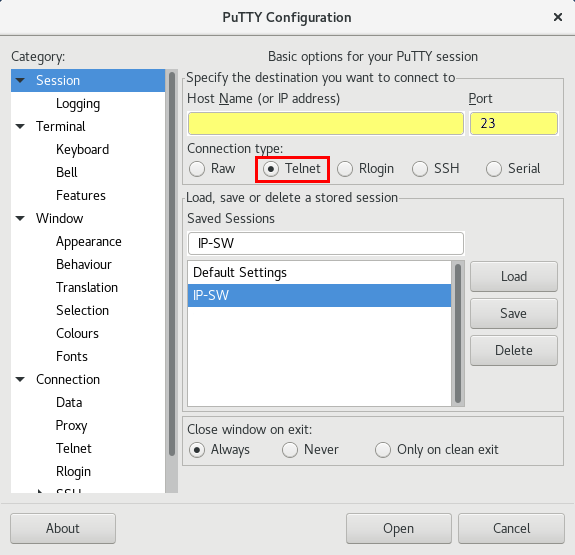
- In main menu Session select or set the following values

- select Telnet
- port 23
- write IP address (saved from first step acces)
- Sessions may be saved for next time
- for connect press Open
- Login confirm with press
y
- Now answer four times the question of what character is on random selected position, in your key (key saved from first step acces). Key formated in groups of ten - FOR EXAMPLE
Position  KEY
 1-10     pP75tf8qrF
11-20     y4SK57dpnC
21-30     fpag8x9eZ4
31-40     IsueSv4jCY
41-50     pX3lpK4UPD
51-60     ij1bbLEQRu
61-70     XRr9dfoJje
71-80     44u5MYQdcm
81-90     B68NpG7F0t
91-100    5mD04pAE6s
- if you enter wrong three times, login will be blocked for next ten minutes
- After login your IP address store to EEPROM and next key will be required only if change your IP address
- Now logged in to CLI (command line interface) via telnet
- for Logout press q


How command are available
| ? | List status information and command |
| a | set wind speed alert, if exceed limit (not implemented) |
| O | set pressure ofset in hPa |
| * | enable/disable serial/telnet debug, switching between three status disable, enable, enable frenetic mode |
| + | change MQTT broker IP and port - defailt value used RemoteQTH.com public MQTT broker |
| L | change location name, or callsign with ssid if enable APRS |
| A | enable/disable upload to hamradio APRS network (requires a valid license) |
| s | enable/disable external temperature sensor DS18B20 connected to P4 by this schematics/picture 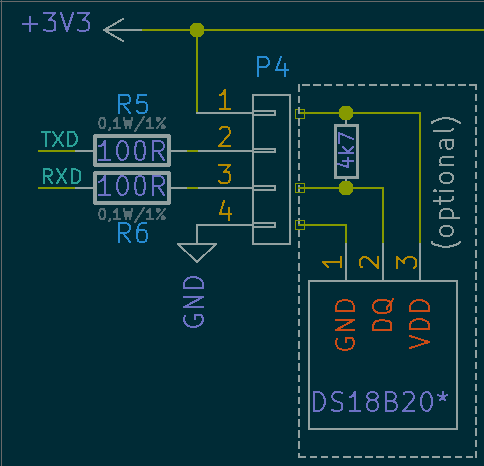 NOTICE If use external temperature sensor DS18B20, must add 4k7 pull-up rezistor between +3,3V and data (pin 1 and pin3 on P4 connector)  How to build passive thermometer sun shield |
| q | disconect telnet, also show login verified IP address |
| Q | disconect telnet with erase verified IP addres - will be required key in the next time you log in |
| e | list EEPROM (only for debbuging) |
| . | reset half hour timer and send measure to MQTT (and APRS if enable) |
| @ | restart device (causes telnet disconnection) |
Third step - MQTT
If open IP address of WX station in web browser, load MQTT-wall.
That propagate every half hour last measured value.
How to build
The screws do not need any nuts because the holes are conical.
- Check if all parts is present

- Trim all soldered THT pin on back side of PCB

- Use two screw M3x10 for mount PCB to printed parts number 2 and use two cable tie

- Use two screw M3x10 for mount PCB to printed parts number 1

- You can seal the hole on the top with silicone

- Silicone top hole

- Slide in brass threaded rod M6x220mm
Slide in printed parts number 7 and screw in 2x M2x10

- Press the bearing into printed parts number 8
If need precise tuning outside diameter, use this value in OpenScad sourceBearingInTuning = +20; // +- smooth tuning bearing inner diameter in um

- Slide in neodymium magnet - magnet must be turned north side inwards

- Slide the printed part onto the assembled part
 if your printer's tolerance is different, you can generate a set with select part number 16 in openScad source
Part = 16; // select part 0-16, -1=all, 16=variant of inner
- Slide in printed parts number 10 and screw in 2x M2x10

- Press the bearing into printed parts number 11
If need precise tuning outside diameter, use this value in OpenScad sourceBearingInTuning = +20; // +- smooth tuning bearing inner diameter in um

- Slide in neodymium magnet - magnet must be turned north side top

- Slide the printed part onto the assembled part


- Slide in two small neodymium magnet - must be turned bottom north side

- Screw in 2x M3x10 - after tightening, loosen by one turn

- Carefully insert the PCB coin and plug in to connector

- Silicone top hole

- Put on printed parts number 12 and tighten with a brass nut
free hole around PCB it is necessary to seal with silicone
- The screw must not protrude beyond the nut

- Silicone top hole

- With press the pliers to put on

- Screw in M3x10 to printed parts number 14

- fit the azimuth blade and screw it on stainless steel threaded rod M6x125mm on, so as to keep them horizontally balanced - M6 nuts can be screwed in for balancing

- Fit part number 14 on part number 12 so that the locking screw is against the bottom hole

- Install the three anemometer blades

- Connect ESP32-POE to PCB and fix with two lashing straps

- Slide in printed part number 0 and fasten with a screw M3x10

- Pass two lashing straps to attach to the mast


Passive thermometer sun shield
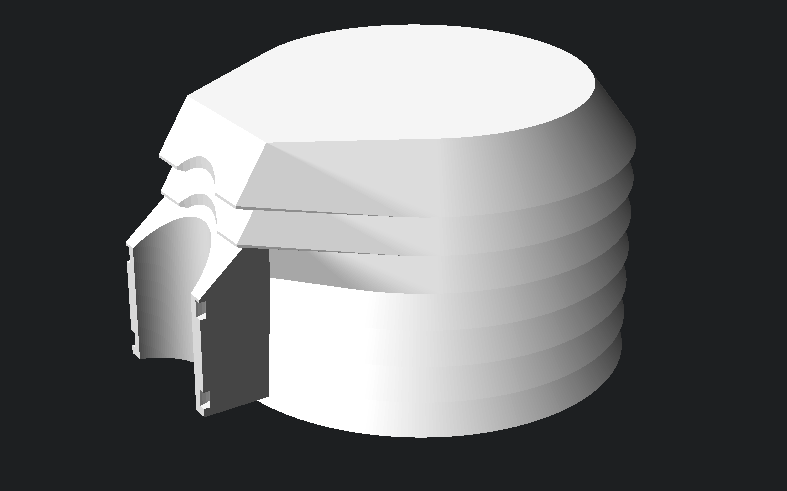

This part needed for accurate measure of temperature.
- First step measure mouting pipe diameter

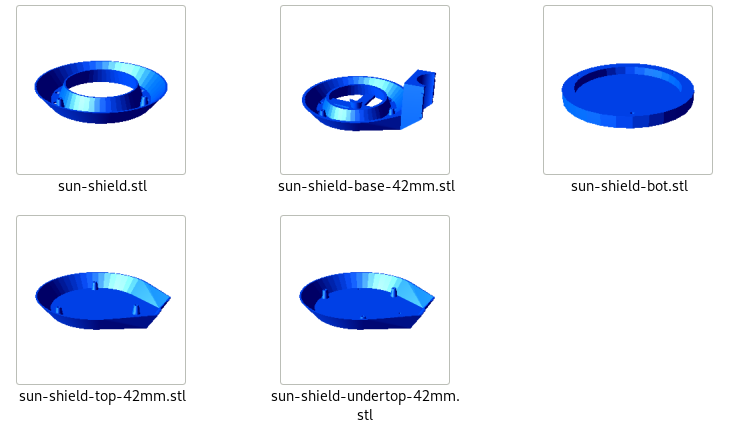
- Now open source code in OpenScad and change line
MOUNTDIA = 42;
- Change the parameter gradually from 1 to 3
Part = 1;
then press F6 and F7 for .STL export this part. Other parts not depend to mounting pipe diameter.
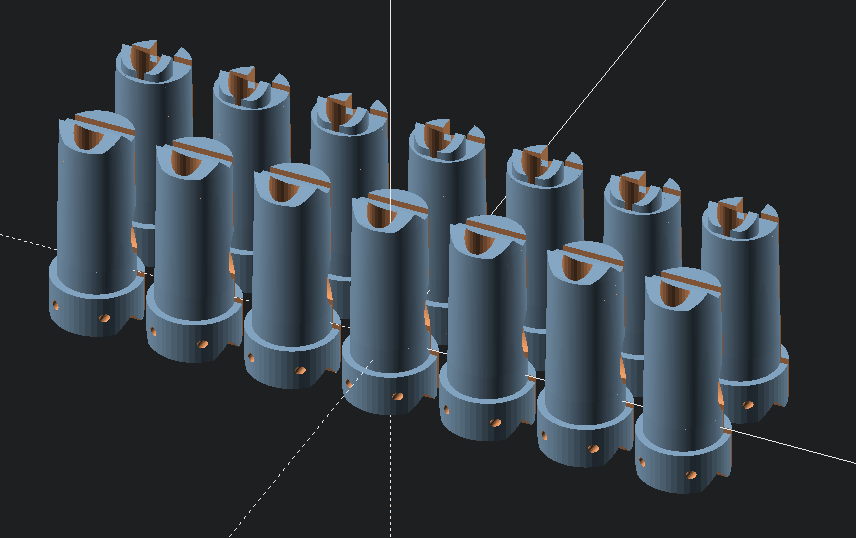
- After complete all STL parts you can start 3D printing with WHITE PETG filament. Sun-shield part nr 4 you print four times.

| M3 x10 mm | 18x |
| M3 x 20mm | 3x |
| Outdoor DS18B20 temperature sensor | 1x |
| Plastic binder | 5x |
- Check all parts

- Mount three screw M3x10mm for join part 1 and 2

- Plug thermistor to center part 3


- Mount three screw M3x10mm for join every floor


- For Mount bottom grid with M3x20mm

- Final mounting to pipe


Instalation
ToDo
- LoRa firmware support