This is an old revision of the document!
Table of Contents
Icom CI-V stepper allows tuning with stepper motor Nema 17 some devices dependancy to Icom frequency
Quick start guide
- Connect hardware
- Stepper
- Endstop switch
- 24V DC power Supply
- TX inhibit output
- CI-V
- Configure over USB CLI
Hardware
Connect
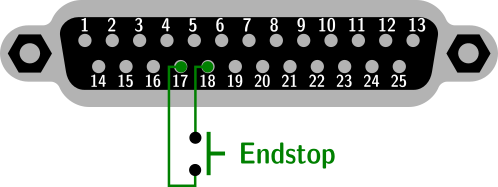
Endstop
Switch for calibrate start point motor stepper (zero step, zero °). After start up stepper spins reverse ↺ and wait for endstop signal who stops him and resets counters.
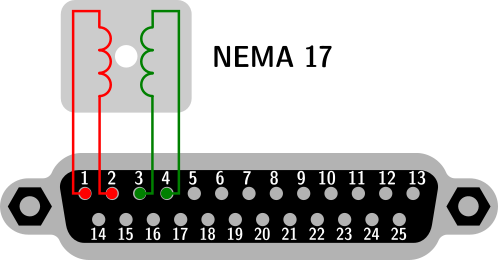
Stepper
Connect two phase 'NEMA 17' stepper motor. Another type not supported. One of the phases is known by the ohmmeter. Another phase is isolated.
* If stepper rotate reverse, you can change polarity one phase or activare reverse from CLI.
[https://remoteqth.com/img/wiki-civ-stepper-04.png|noborder]
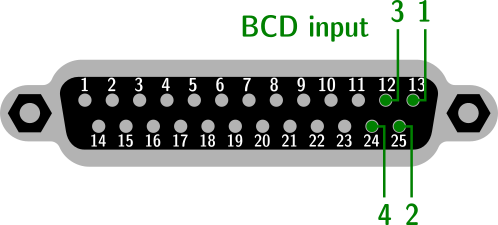
!! BCD input
Activate by grounded +5V pull-up.
[https://remoteqth.com/img/wiki-civ-stepper-06.png|noborder]
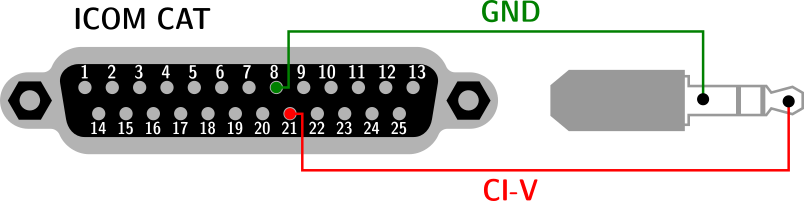
!! CAT
Connected to Icom or MicroHam CI-V outputs.
[https://remoteqth.com/img/wiki-civ-stepper-07.png|noborder]
!! TX Inhibit output
Open collector without pull-up.
[https://remoteqth.com/img/wiki-civ-stepper-08.png|noborder]
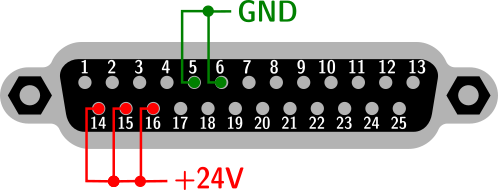
!! Power supply
24V with 1A power rating. Lowest voltage accepted, but stepper lower torque.
[https://remoteqth.com/img/wiki-civ-stepper-03.png|noborder]
!! USB Command Line Interface (CLI)
!!! How to connect
* Connect USB micro cable between CLI stepper and your PC
* install [PuTTY terminal|https://www.putty.org/]
* after run it set
'com port' dependency to your system
baudrate to '115200'
Connection type to 'Serial'
In Terminal category turn off options 'Implicit CR' and 'Implicit LF' by picture [https://remoteqth.com/img/wiki-civ-stepper-02.png]
press 'Open'
!!!CLI commands
After open PuTTY press character [?] who show actual setting and available command
[https://remoteqth.com/img/wiki-civ-stepper-01.png]
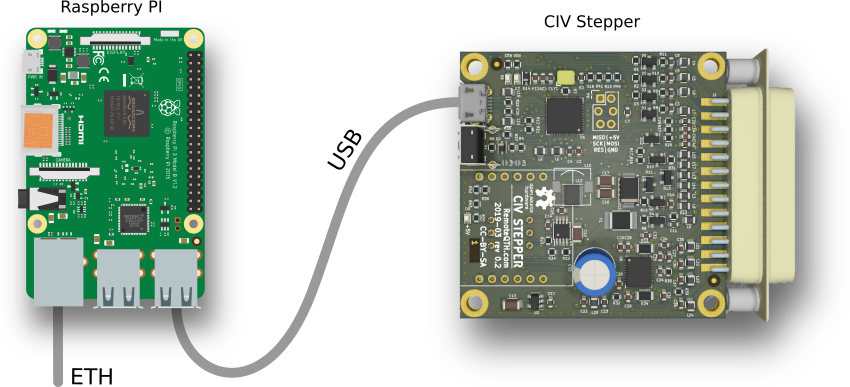
!!! Secure remote manage
Configuration available via serial CLI (command line interface). This interface can be safely accessed to the Internet and encrypted connections to manage all features
[https://remoteqth.com/img/wiki-civ-stepper-09.png|noborder]
What you need
* any version Raspberry PI
* microSD card with [Raspbian Lite|https://www.raspberrypi.org/downloads/raspbian/]
* micro USB cable
* 5V power adapter with micro usb cable
* ethernet connection
* for first start HDMI monitor and USB keyboard
How to start
* after first boot login to serial console with default login 'pi' and password 'raspberry'
* run command and 'enable [SSH|https://www.raspberrypi.org/documentation/remote-access/ssh/]'sudo_raspi-config
* run command and write down the shown 'IP address'ip_a
* you can disconnect HDMI monitor and USB keyboard
* connect to Raspberry PI from any other PC
[windows|https://www.raspberrypi.org/documentation/remote-access/ssh/windows.md]
[Linux|https://www.raspberrypi.org/documentation/remote-access/ssh/unix.md]
[iOS|https://www.raspberrypi.org/documentation/remote-access/ssh/ios.md]
* update system with run commandsudo_apt-get_update_sudo_apt-get_upgrade
* install screen fith command sudo_apt-get_install_screen
* run 'screen'screen_dev_ttyusb0_115200
* now after pres ? key show status information and you can 'configure via CLI'[https://remoteqth.com/img/wiki-civ-stepper-01b.png]
* close screen with 'CTRL+A K' and confirm 'y'
* disconnect from Raspberry PI use command exit
![https://remoteqth.com/img/wiki-civ-stepper-02.png]](https://remoteqth.com/img/wiki-civ-stepper-02.png])
![https://remoteqth.com/img/wiki-civ-stepper-01.png]](https://remoteqth.com/img/wiki-civ-stepper-01.png])
![https://remoteqth.com/img/wiki-civ-stepper-01b.png]](https://remoteqth.com/img/wiki-civ-stepper-01b.png])
!Firmware
For upload firmware you have two possibilities
# Download 'source' from [GitHub|https://github.com/ok1hra/CI-V_stepper] and compile in [Arduino IDE|https://www.arduino.cc/en/Main/Software]
## Install [EEPROM library|https://www.arduino.cc/en/Guide/Libraries]
# Download 'compiled binary' from [release page|https://github.com/ok1hra/CI-V_stepper/releases] and upload with some tool
## for example [avrdude|http://www.ladyada.net/learn/avr/avrdude.html] or [Xloader|http://xloader.russemotto.com/] for windows
!! Firmware source
contains some settings which does not available from CLI
* You can enter 'frequency and uStep directly in to firmware' without CLI wizard. How to
Disable preset coment line
Write frequency and uSteps i to arrayunsigned_long_storagefreqtostep_112_2_7000000_0_7010000_500_7020000_1000_7030000_1500_7040000_2000
Upload firmware
Select BCD input to bank-0 (must be, because only bank-0 saved also frequency, higest bank saved uStep only)
Save frequency/uStep table from RAM to EEPROM with command [s] in CLI
Replay edit table, upload and save for any higher bank
After fill EEPROM to your liking, enable command in source file
After upload frequency/uStep table will be set by preset selected bank. For more info use command [l] or [e] in CLI.
* Time (second number in ms) after which reduce stepper current and save last position to eeprom, if disable endstoplong_currentruntimeout_2_0_1000
* Enable serial debug if uncoment this line
* CLI baudrate, default is 115200const_int_baudrate0_115200
!MQTT variant * need install wiznet ethernet module * use another firmware [GitHub|https://github.com/ok1hra/MQTT-stepper] * for setup and control see source code header